
How To Add The Duolingo Widget On ios: Quick Setup Steps

Learning a new language has never been easier, thanks to apps like Duolingo. For iOS users, adding the Duolingo widget to your home screen can help you stay consistent with your language goals by providing quick access to lessons and progress tracking. This article will guide you through the simple steps to set up the Duolingo widget on your iPhone or iPad. Whether you're a beginner or a seasoned learner, having this handy tool at your fingertips ensures that language practice becomes a seamless part of your daily routine. Let’s dive into the quick setup process to enhance your learning experience.
How To Add The Duolingo Widget On iOS: Quick Setup Steps
Step 1: Update Your iOS Device
To ensure compatibility with the Duolingo widget, make sure your iOS device is running the latest version of iOS. Go to Settings > General > Software Update to check for updates. If an update is available, download and install it before proceeding.
Step 2: Download the Duolingo App
If you haven’t already, download the Duolingo app from the App Store. Open the App Store, search for Duolingo, and tap Get to install it. Once installed, log in or create an account to access your language learning progress.
See AlsoDo you have to learn to write Chinese characters by hand?Step 3: Access the Widget Gallery
To add the Duolingo widget, swipe right on your Home Screen or Lock Screen to access the Today View. Scroll to the bottom and tap Edit. This will open the Widget Gallery, where you can browse and add widgets.
Step 4: Add the Duolingo Widget
In the Widget Gallery, search for Duolingo. Once you find it, tap the + icon next to the widget to add it to your Today View. You can choose from different widget sizes, such as Small, Medium, or Large, depending on your preference.
Step 5: Customize and Organize Your Widget
After adding the Duolingo widget, you can drag and drop it to rearrange its position in the Today View. To customize the widget, press and hold it, then select Edit Widget. This allows you to adjust settings like which language or progress tracking to display.
See AlsoBest Program to Learn Chinese: The Ultimate Guide| Step | Action |
|---|---|
| 1 | Update your iOS device |
| 2 | Download the Duolingo app |
| 3 | Access the Widget Gallery |
| 4 | Add the Duolingo widget |
| 5 | Customize and organize your widget |
How do I add custom widgets to iOS?
Understanding iOS Widgets and Their Customization
iOS widgets are small, interactive elements that display information from apps on the Home Screen. To add custom widgets, you need to understand how they work and the tools required for customization. Widgets are built using WidgetKit, a framework provided by Apple, which allows developers to create widgets that integrate seamlessly with iOS. Here’s how you can get started:
- Familiarize yourself with WidgetKit and its capabilities.
- Ensure you have the latest version of Xcode installed.
- Learn the basics of SwiftUI, as widgets are built using this framework.
Creating a Custom Widget Using Xcode
To create a custom widget, you’ll need to use Xcode, Apple’s integrated development environment (IDE). Follow these steps to build your widget:
See AlsoAI Language Learning: 6 Reasons it Doesn't Work- Open Xcode and create a new project using the App template.
- Add a new target to your project and select the Widget Extension option.
- Customize the widget’s appearance and functionality using SwiftUI.
Designing the Widget Interface with SwiftUI
The design of your widget is crucial for user experience. Using SwiftUI, you can create a visually appealing and functional widget. Here’s how to design the interface:
- Use SwiftUI views like Text, Image, and Stack to build the layout.
- Apply modifiers to customize the appearance, such as font, color, and padding.
- Test the widget in the Canvas preview to ensure it looks good on different screen sizes.
Configuring Widget Data and Timeline Updates
Widgets rely on data to display relevant information. You need to configure how the widget fetches and updates its data. Here’s how to set it up:
- Define a TimelineProvider to manage the widget’s data updates.
- Use URLSession or other APIs to fetch data from your app or external sources.
- Schedule updates using the Timeline to ensure the widget stays current.
Testing and Deploying Your Custom Widget
Before deploying your widget, thorough testing is essential to ensure it works as expected. Follow these steps to test and deploy your widget:
See AlsoAre you practising Chinese the right way? Is your method valid?- Use the iOS Simulator in Xcode to test the widget on different devices.
- Check for performance issues, such as slow data loading or excessive battery usage.
- Submit the widget to the App Store as part of your app’s update or release.
How do I resize the Duolingo widget?

How to Resize the Duolingo Widget on Android
To resize the Duolingo widget on an Android device, follow these steps:
- Long-press on the Duolingo widget on your home screen.
- Drag the resize handles that appear around the widget to adjust its size.
- Release your finger once the widget is the desired size.
How to Resize the Duolingo Widget on iOS
Resizing the Duolingo widget on iOS involves these steps:
- Enter jiggle mode by long-pressing on the widget or an empty area of the home screen.
- Tap the widget to bring up the resize options.
- Select a different size from the available options and confirm.
Using Widget Settings to Resize the Duolingo Widget
Some devices allow resizing through widget settings:
- Access the widget settings by long-pressing the widget.
- Look for a resize option or settings icon within the widget menu.
- Adjust the size using the provided sliders or options.
Common Issues When Resizing the Duolingo Widget
If you encounter problems while resizing, consider the following:
- Ensure your device's operating system is up to date.
- Check if the Duolingo app is updated to the latest version.
- Restart your device if the widget does not respond to resizing attempts.
Alternative Methods to Customize the Duolingo Widget
If resizing is not an option, try these alternatives:
- Use a third-party launcher that offers more widget customization options.
- Remove and re-add the widget to see if it allows resizing upon reinstallation.
- Contact Duolingo support for further assistance if the issue persists.
Frequently Asked Questions From our Community
What is the Duolingo widget and why should I add it to my iOS device?
The Duolingo widget is a convenient tool that allows you to access your language learning progress directly from your iOS home screen. By adding the widget, you can quickly view your daily streak, complete lessons, and stay motivated without opening the app. It’s an excellent way to integrate language learning into your daily routine and ensure you don’t miss your practice sessions.
How do I add the Duolingo widget to my iPhone home screen?
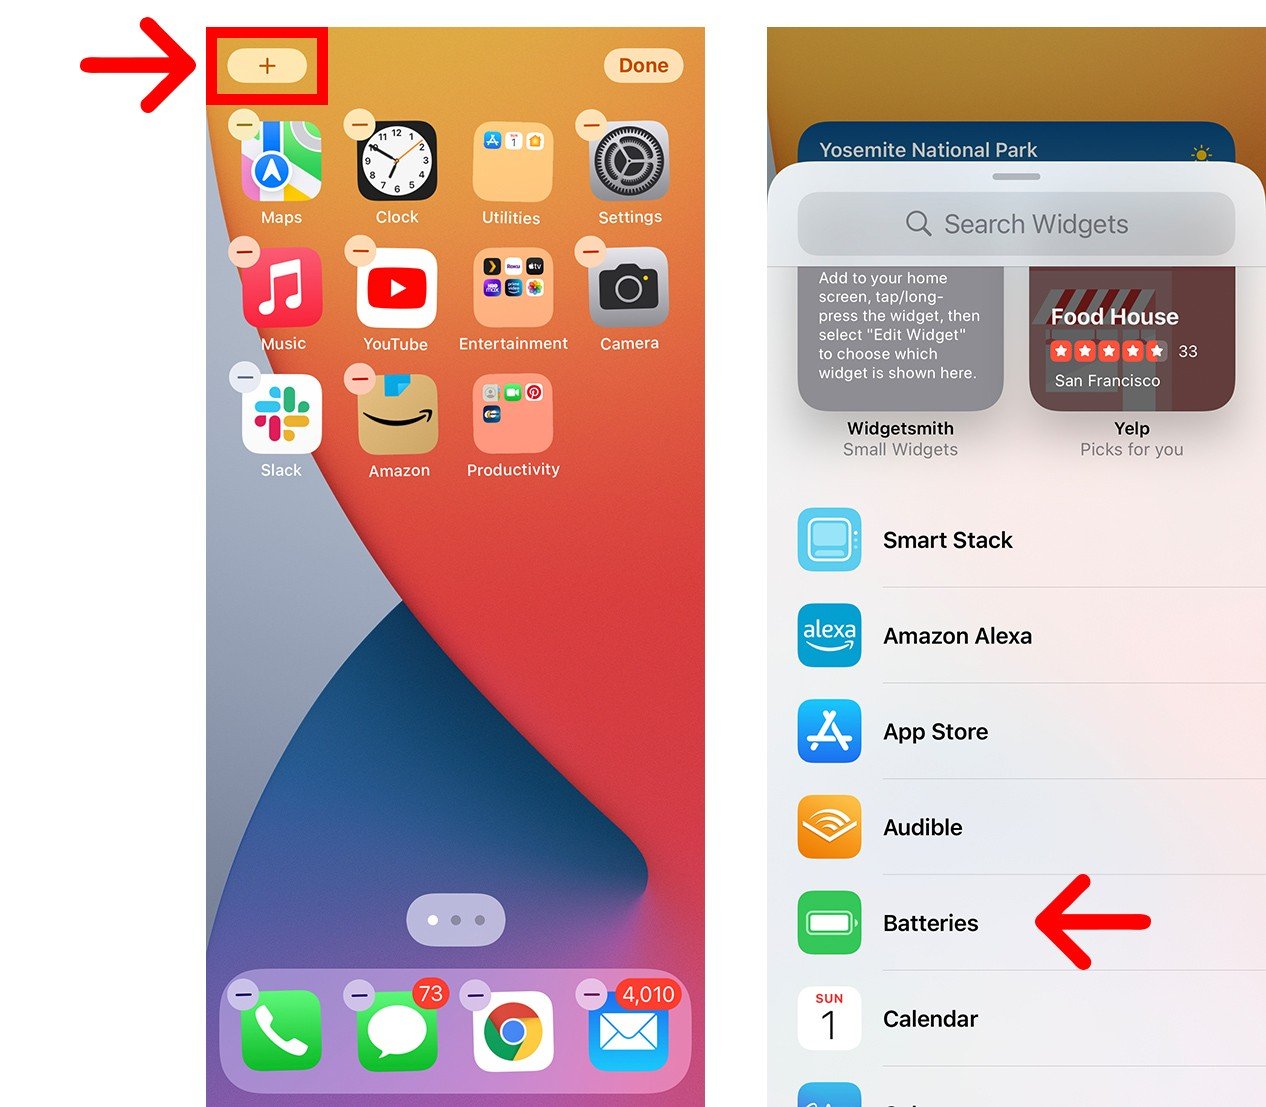
To add the Duolingo widget to your iPhone home screen, follow these steps: First, press and hold an empty area on your home screen until the apps start jiggling. Then, tap the + button in the top-left corner to open the widget gallery. Search for Duolingo, select the widget size you prefer, and tap Add Widget. Finally, drag the widget to your desired location and tap Done to save the changes.
Can I customize the Duolingo widget on iOS?
While the Duolingo widget on iOS doesn’t offer extensive customization options, you can choose between different widget sizes (small, medium, or large) to fit your home screen layout. The widget primarily displays your daily streak, progress, and quick access to lessons. Unfortunately, you cannot change the content or design beyond the available sizes.
Why isn’t the Duolingo widget showing up in my widget gallery?
If the Duolingo widget isn’t appearing in your widget gallery, ensure that you have the latest version of the Duolingo app installed on your device. If the app is up to date and the widget still doesn’t appear, try restarting your iPhone. Additionally, check if your iOS version supports widgets, as they are only available on iOS 14 or later. If the issue persists, reinstalling the app may resolve the problem.
Leave a Reply
Related Posts